
Add Flagged Fields to a Candidate's Profile
Overview
Candidate profiles contain the information needed to evaluate applicants throughout the hiring process. While much of this information is collected during the application process, your team may also need to capture additional details after a candidate has applied.
Flagged Fields allow your team to add standardized, customizable fields to candidate profiles so important information is collected consistently across your organization.
Note: Flagged Fields are available on select pricing plans. If this feature is not available in your account, contact Trakstar Hire Support for more information. Reach out to us at hire@trakstar.com for additional information.
Watch this video, or, read on to learn more!
In Summary, Flagged Fields Are:
Custom fields that appear directly on a candidate's profile that are filled by a user.
Unlike the Add More Info section, Flagged Fields are standardized across your account and can be configured to:
- Require users to complete specific fields.
- Apply to all candidate profiles or only candidates in selected openings.
- Restrict visibility to designated user roles.
- Use standardized answer formats to improve data consistency.
Where Do Flagged Fields Appear?
Flagged Fields are displayed on the candidate profile:
- Below the Description section.
-
Above the candidate's Resume.
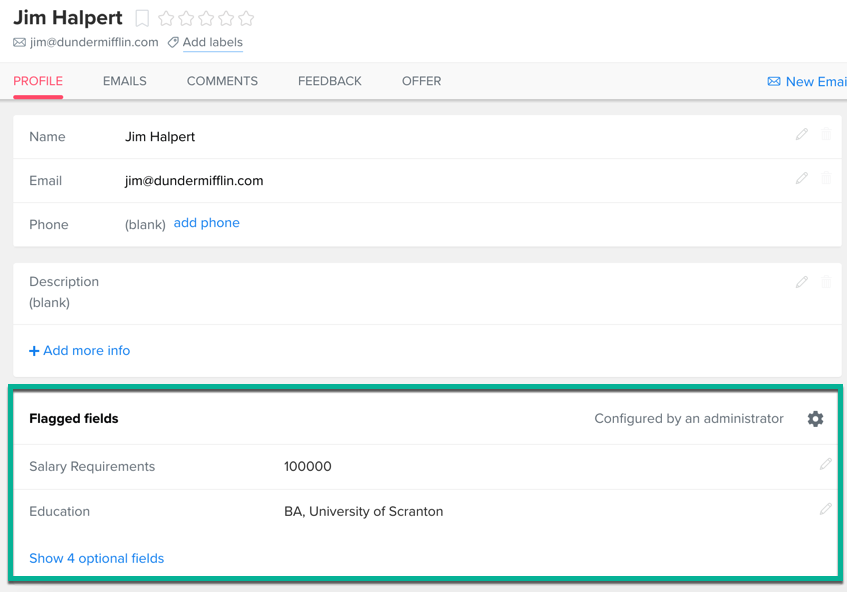
If required fields have not yet been completed, a red badge displays the number of outstanding required entries.

When Should You Use Flagged Fields?
Application forms often collect the information needed to evaluate candidates during the initial application process.
Flagged Fields are useful for information gathered later in the hiring process, such as:
- Salary expectations
- Available start date
- Work authorization details
- Screening interview responses
- Internal evaluation information
Using standardized fields helps ensure this information is captured consistently for every candidate.
Set Up Flagged Fields
Only Super Admins can create and manage Flagged Fields.
To create a new field:
- Go to Settings.
- Select the Candidates Configuration section.
-
Open Flagged Fields.

-
Click + Field.

- Enter the field name and any additional configuration options. Also choose whether the field should:
- Apply to all candidate profiles, or
- Apply only to candidates in specific openings.
-
Private or visible to all appropriate users.

- Select whether the field should be:
- Required or optional.
- Choose the desired Answer Type.
- Save the field.


You can create as many Flagged Fields as needed.

Available Answer Types
Flagged Fields support standardized response formats to help maintain consistent data.
Depending on your needs, you can configure fields for answer types such as:
- Multiple choice
- Single line text
- Pre-set lists
- Number
- URL
-
Email address
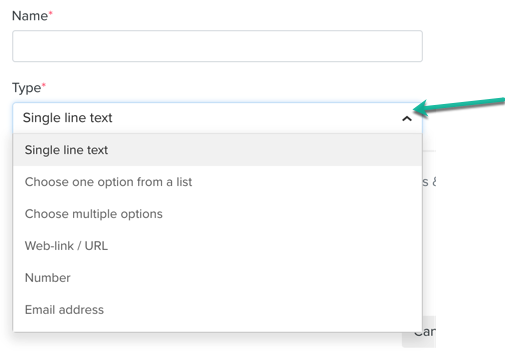
Using predefined answer types helps ensure information is entered in a consistent format across all candidate profiles.
Complete Flagged Fields on a Candidate Profile
After Flagged Fields have been created, they automatically appear on applicable candidate profiles.
To complete a field:
- Open the candidate's profile.
- Locate the Flagged Fields section.
-
Click the pencil icon next to the field you want to edit.

-
Enter the requested information.

- Click Save.


Required fields must be completed before the required field indicator disappears.
Optional fields can be completed at any time.

Private Flagged Fields
Flagged Fields can be marked as Private.
Private fields are only visible to:
- Super Admins
- Recruitment Managers
- Job Admins
Private fields display a lock icon to indicate their restricted visibility.

Super Admins can quickly manage existing Flagged Fields by clicking the settings (gear) icon within the Flagged Fields section of a candidate profile.

This shortcut opens the Flagged Fields configuration page, where fields can be added or updated.
Reporting on Flagged Fields
Flagged Field responses are included in the Candidate Excel Report.
Each field appears as its own column using the following format:
Flagged Field: Field Name
This makes it easy to report on custom candidate information alongside standard candidate data.
Questions? We're here to help. Reach out to us at hire@trakstar.com