
Bulk Upload Candidates
Bulk uploading allows you to import multiple candidates into Trakstar Hire at one time instead of creating each profile individually. This is useful when migrating candidates from another recruiting system, importing resumes from a hiring event, or adding large groups of applicants to an opening.
Depending on your needs, you can upload:
- Candidate information using a CSV file.
- Candidate resumes.
- A combination of candidate information and resumes.
Ways to Bulk Upload Candidates
There are three ways to bulk import candidates into Trakstar Hire:
- Upload a CSV file containing candidate information.
- Upload a ZIP file containing candidate resumes.
- Upload a CSV file and ZIP file together to create complete candidate profiles with both profile information and resumes.
Each import method is designed to help you migrate historical candidate data while keeping your recruiting process organized.
Organize Your Candidate Data
Before importing candidates, decide how you'd like them to appear within Trakstar Hire.
During the import process, every candidate in the upload will receive the same:
- Opening
- Hiring Stage
- Source
- Labels
Because these values apply to the entire import, organizing your files ahead of time makes the process much easier.
Split Your Files Before Uploading
If your candidates belong to different openings, stages, or recruiting sources, separate them into multiple CSV files before importing.
Organize by Opening
Place all candidates who should belong to the same opening into a single spreadsheet.
If candidates belong to different openings, create separate spreadsheets for each opening.
Organize by Source
If candidates were obtained from different recruiting sources, consider separating them into multiple spreadsheets.
Examples include:
- Indeed
- Job fairs
- Employee referrals
- Career fairs
- Recruiting agencies
Assigning a single source per upload helps improve source reporting later.
Organize by Hiring Stage
If candidates are already progressing through your hiring process, separate them based on the stage where they should be placed.
For example:
- Applied
- Phone Screen
- Interview
- Offer
This allows imported candidates to enter your workflow at the correct stage.
Prepare Your Spreadsheet
Each row in your spreadsheet represents one candidate.
Each column represents a piece of candidate information.
Common columns include:
- First Name
- Last Name
- Date Applied
- Current Employer
- Years of Experience
Additional columns can also be included.
Information that doesn't map to standard candidate fields is imported into Additional Details on the candidate profile.
Required Spreadsheet Columns
Two columns are required for every CSV import:
- First Name
These column headers must use these names.
If either required column is missing, the candidates cannot be imported.
Important: If you want to include a candidate's last name, use Last Name as the column heading rather than Surname.
How Spreadsheet Data Maps to Candidate Profiles
During the import:
- Name
- Phone Number
are automatically mapped to the corresponding fields on the candidate profile.
Any additional columns become Additional Details, which appear below the candidate's contact information and above the resume.


Convert Your Spreadsheet to CSV
Candidate spreadsheets must be uploaded as CSV (.csv) files.
If your spreadsheet is currently in another format, convert it before importing.
Microsoft Excel
- Open the spreadsheet.
- Select File > Save As.
- Choose Comma Separated Values (.csv) as the file type.
- Save the file.
Google Sheets
- Open the spreadsheet.
- Select File > Download.
- Choose Comma-Separated Values (.csv, current sheet).


Prepare Resume Files
If you plan to upload resumes, gather all resume files before beginning the import.
Resumes can be uploaded:
- By themselves, or
- Together with a CSV file.
Uploading both provides the most complete candidate profiles.
What Happens When You Upload Resumes?
When resumes are imported without a CSV file, Trakstar Hire automatically creates a candidate profile using information parsed from each resume.
Depending on the information available, the system extracts details such as:
- Candidate name
- Email address
- Phone number


Each uploaded resume is also embedded directly within the candidate profile for easy viewing.
Resume information is indexed for searching, allowing you to use Advanced Search to locate candidates based on resume content.
If resumes are uploaded together with a CSV, Trakstar Hire:
- Uses the CSV to populate the candidate profile.
- Matches resumes to candidates listed in the spreadsheet.
- Discards any resumes that do not match a candidate in the CSV.
If you upload the resume files simultaneously as the CSV file, the CSV file will populate the candidate's profile info, and the resume will be matched up. Any resumes that do not match a candidate on the CSV file will be discarded.
Resume Formats
Trakstar Hire supports a variety of resume file formats.
Supported formats include:
- DOC
- DOCX
- HTML
- TXT
- Other common resume file formats
If your resumes are on paper, scan them before importing them into Trakstar Hire.
Create a ZIP File of Resumes
Resume files must be compressed into a ZIP file before they can be uploaded.
As with CSV imports, you'll want to organize your resume files before creating the ZIP file.
Since every resume in a ZIP file receives the same Opening, Stage, Source, and Labels during import, consider creating separate ZIP files for different groups of candidates.
For example, organize resumes by:
- Opening
- Recruiting Source
- Hiring Stage
This allows imported candidates to be organized correctly once they are added to Trakstar Hire.
Note: ZIP files must be less than 100 MB.
Depending on the size of each resume, this is typically between 50 and 300 resumes per ZIP file.
Create a ZIP File on macOS
- Place all resumes into a single folder.
- Right-click the folder.
- Select Compress.
A ZIP file is automatically created and is ready for upload.

Create a ZIP File on Windows
- Place all resumes into a single folder.
- Right-click the folder.
- Select Send to > Compressed (ZIP) Folder.
Windows creates a compressed ZIP file that can be uploaded into Trakstar Hire.

Create a ZIP File from Google Drive
If your resumes are stored in Google Drive:
- Place all resumes into a single folder.
- Right-click the folder.
- Select Download.
Google Drive automatically downloads the folder as a compressed ZIP file.

Import Candidates from a CSV
Once your CSV file is ready, you're ready to begin the import.
- Select Candidates from the left navigation menu.
[Screenshot: Candidates menu]
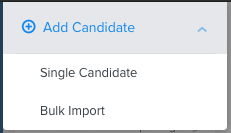
- Click + Add Candidate.
- Select Bulk Import.

Select an Opening and Hiring Stage
Choose:
- The Opening where candidates should be added.
- The Hiring Stage where candidates should begin.
Then click Continue.
Tip: If you don't want to associate imported candidates with an opening, select No Opening.


Choose the Import Method
Select Import Data from CSV.


Review Your Data
After the file uploads, Trakstar Hire displays a preview of your spreadsheet.
Review each column carefully before continuing.
You can:
- Edit column headings.
- Reassign mapped fields.
- Correct column assignments using the green pencil icons.
If required fields are missing or incorrectly mapped, Trakstar Hire prompts you to correct them before continuing.
When everything looks correct, click Looks Good, Continue.
Upload Candidate Resumes (Optional)
After reviewing your CSV, you have the option to upload a ZIP file containing candidate resumes.
This step is optional.
If you don't want to upload resumes, select Proceed without Resumes.
[Screenshot: Resume upload screen]
If you upload a ZIP file:
- Resumes are matched with candidates listed in the CSV.
- Resumes that don't match a candidate in the CSV are discarded.
After uploading the ZIP file, click Continue.


Assign Labels and Sources
Before completing the import, assign any Labels or Sources you'd like applied to every candidate in the upload.
Labels help organize candidates.
Sources help improve recruiting reports and identify where candidates originated.

Create Candidates
When everything has been been reviewed:
Click Create Candidates.
The import begins immediately.
Candidate imports are processed in the background, allowing you to continue working in Trakstar Hire while the upload completes.
You'll receive an email notification when the import finishes successfully.

Choose the Import Method
Select Import Only Resumes.

Upload the ZIP File
Upload the ZIP file containing your resumes.
Note: Only one ZIP file can be uploaded at a time.
After the upload is complete, click Continue.


Create Candidates
When you're ready, click Create Candidates.
The import is processed in the background.
You'll receive an email notification once the upload has completed successfully.

Repeat these steps if you have multiple files to upload for other openings, sources, or labels!
Troubleshooting
If you experience problems during the import process, the Trakstar Hire Support team is available to help.
I Received an Error During Upload
If an error occurs while uploading your CSV or ZIP file:
- Do not attempt the upload again immediately.
- Contact hire@trakstar.com for assistance.
The Support team can review your files and help identify the cause of the error before another import is attempted.
My Upload Completed, but I Don't See My Candidates
Depending on the size of your import, it may take several minutes for candidates to appear in your account.
You'll receive an email notification once the import has finished processing.
If you still don't see your candidates:
- Go to Candidates.
- Select All Accessible.
Candidates that aren't assigned directly to you may still appear in this view.
If your candidates still haven't appeared after approximately 15 minutes, contact hire@trakstar.com before attempting another upload.
Questions? Feel free to reach out at any time! hire@trakstar.com.